

Last Updated: November 1, 2026
Quick Summary
To apply tape-in extensions for a seamless look, section clean, product-free hair into thin horizontal rows and sandwich each weft one to two centimetres from the scalp between two adhesive strips. Press firmly with no air bubbles, leave a top layer loose to conceal the tapes, and re-tape every few weeks as your hair grows.
- Wash with clarifying shampoo the day before and skip conditioner at the roots.
- Part rows roughly one to two centimetres above the nape and keep each section thin.
- Position each weft one to two centimetres from the scalp, never touching the root.
- Leave a top layer of your own hair loose over the highest row to hide the tapes.
- Book a maintenance appointment every few weeks as your natural hair grows.
Table of Contents
- What You Need Before You Apply Tape-In Extensions
- How to Section Hair for Tape-In Extensions
- How to Place Tape-In Extensions for Invisible Placement
- How to Blend Tape-In Extensions with Your Natural Hair
- Tape-In Extensions Aftercare That Protects the Bond
- Troubleshooting Poor Adhesion and Visible Tapes
- Choosing Your Tape-In Extensions and Booking Your Install
- Frequently Asked Questions
What You Need Before You Apply Tape-In Extensions
Tape-in extensions are wefts of human hair held in place by a thin strip of adhesive that sits flat against your natural hair. They give instant length and volume without glue, heat or clips. Tape-in extensions are most successful when the prep stage is done well.
Here is what you need within reach before you start:
- Tape-in wefts in a shade matched to your root colour
- A tail comb for clean, straight partings
- Sectioning clips to hold hair out of the way
- A fine-tooth comb for detangling
- A clarifying shampoo for washing hair the day before
- A mirror you can see the back of your head in
- A friend or a stylist for the back sections
The single most common mistake is applying tape-in extensions to hair that has conditioner residue on it. The adhesive needs a clean, dry surface to grip. Wash with clarifying shampoo the day before, skip conditioner at the roots, and let hair dry fully. Damp hair weakens the bond before it has even set.
Not every head is ready for tape-ins. Tape-ins add weight to the root area, and that weight needs healthy hair to carry it.
How to Section Hair for Tape-In Extensions
Sectioning is the step that decides whether your tape-in extensions look invisible or obvious. Tape wefts sit in horizontal rows, so your partings must be clean, level and evenly spaced. Work from the nape upward, one row at a time.
Follow this order:
- Detangle fully with a fine-tooth comb, from ends to roots.
- Part a horizontal line roughly one to two centimetres above the nape.
- Clip the rest of your hair up and out of the way.
- Measure your rows so each sits about the same distance apart.
- Leave the hairline and nape clear by at least two finger-widths.
Keep each section thin. A thin section lets the tape sandwich close flat against the head. If you grab too much hair, the weft sits proud and shows through the top layer.
For different head shapes, adjust rather than force. A rounder crown needs slightly narrower rows near the top. A flatter back of head can take wider rows lower down. If you wear a centre parting, keep your rows symmetrical on both sides so the fall of hair stays even.
How to Place Tape-In Extensions for Invisible Placement
Placement is where a seamless look is won. Position each tape weft about one to two centimetres from the scalp, never touching the root, and press it flat beneath a thin section of natural hair. Then sandwich a second weft on top so your own hair sits between the two adhesive strips.
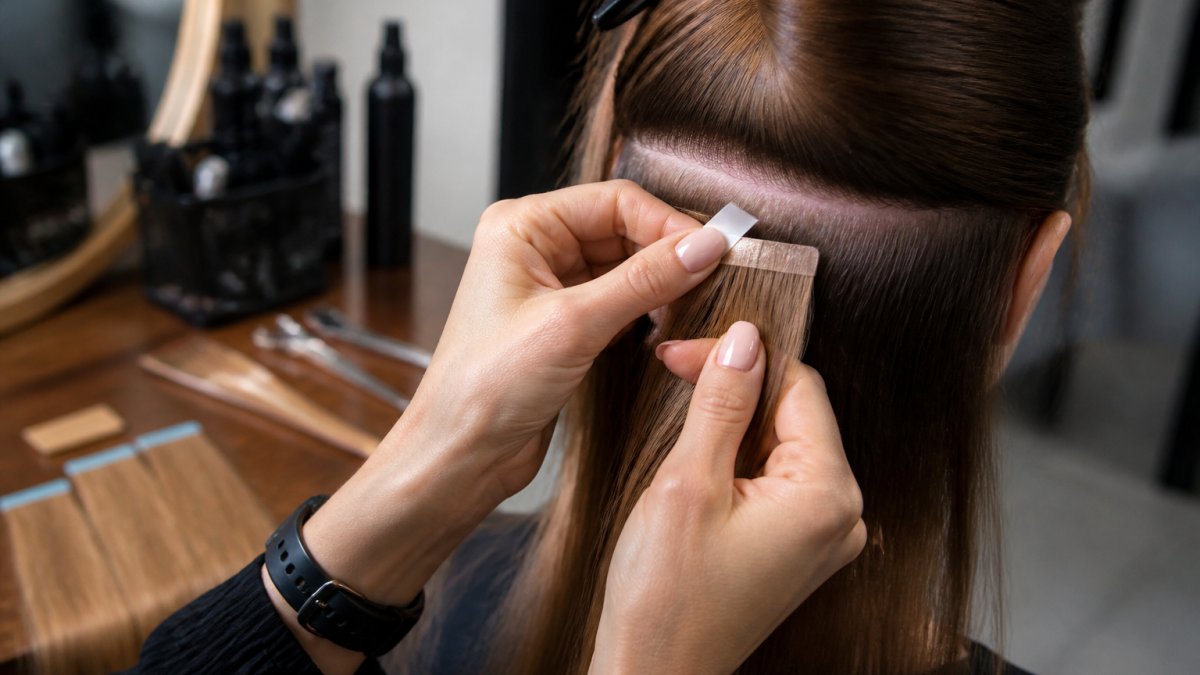
Work through it like this:
- Section off a thin, horizontal band of natural hair.
- Peel the adhesive backing from one tape weft.
- Position the weft underneath the section, sticky side up, one to two centimetres from the root.
- Press firmly along the tape with no air bubbles.
- Place the matching top weft directly above, sticky side down.
- Press the two tapes together through your natural hair to seal the sandwich.
- Repeat across the row, then move up.
The distance from the scalp matters more than anything else. Too close and the tape pulls at the root and feels uncomfortable. Too far and the weft droops and shows. One to two centimetres is the sweet spot.
A common mistake is pressing the wefts together with hair trapped in the adhesive. Smooth the natural hair flat before you close the sandwich. Watch out: if you feel a lump or a hard edge under your fingers, the tape has folded or trapped hair, and it will show through styling.
How to Blend Tape-In Extensions with Your Natural Hair
Blending turns a good install into an invisible one. The goal is to conceal the tape rows under your own hair so the transition from natural to extension disappears. Cut, layer and style with the tape lines in mind.
Start with these habits:
- Leave a top layer of your own hair loose over the highest row.
- Ask for a light layer through the ends so the length blends.
- Style with loose waves to soften any visible line.
- Avoid tight, high ponytails that expose the tapes at the sides.
- Change your parting now and then to spread tension.
If your natural hair is much shorter or finer than the extensions, blending takes more work. A stylist can point-cut the ends to match texture, which does more for a natural-looking result than any product. For deeper guidance on making extensions sit naturally against your own hair, read our advice on how to make extensions for natural hair blend better.
Tape-In Extensions Aftercare That Protects the Bond
Aftercare is what keeps tape-in extensions secure between appointments. The adhesive is strong but not invincible. Oil, heat and rough brushing all shorten its life. Treat the bond gently and your extensions will last through several re-tapes.
Build this routine:
Raw Tape-In Extensions Dark Brown / Black →
- Brush gently from ends to roots with a soft brush.
- Wash less often, and use sulphate-free shampoo.
- Keep conditioner off the tape and away from the root area.
- Dry the tapes fully after washing, using low heat.
- Avoid oil-based products near the bond.
- Sleep with hair loosely tied to reduce friction.
- Book a maintenance appointment every few weeks as your hair grows.
The tapes move down as your natural hair grows, so re-taping keeps the placement correct. Most wearers need this every few weeks. Skip it and the wefts drop, the rows show, and the seamless look goes with them.
Follow the specific instructions supplied with your tape-in product, because adhesive formulations and recommended wear times vary between brands. Tapes move down as natural hair grows, so re-taping every few weeks keeps the placement correct.
Gentle handling between washes helps the bond last. Avoid pressing heat tools directly against the tape tabs.
If you colour your natural hair, tell your stylist about the extensions before any root touch-up.
Troubleshooting Poor Adhesion and Visible Tapes
Poor adhesion and visible tapes usually trace back to three causes: residue on the hair, a section that was too thick, or a tape that was pressed with air trapped underneath. Each has a fix.
Run through this checklist when something feels off:
| Problem | Likely cause | Fix |
|---|---|---|
| Weft slipping within days | Oily or conditioned hair | Clarifying wash, then re-tape |
| Tape visible at the root | Placed too far from scalp | Reposition one to two centimetres out |
| Hard lump under hair | Hair trapped in the sandwich | Open, smooth hair flat, re-press |
| Discomfort at the root | Section too thick or tape too close | Thin the section, reset placement |
| Rows showing through | Not enough top layer left loose | Restyle with a looser top section |
If a weft lifts at the edge, resist the urge to press it back down with heat. That softens the adhesive and makes it worse. Remove that piece, clean the tape area, and reapply with a fresh tab.
Clean, dry, product-free hair gives tape adhesive the best chance to grip. If a weft slips, residue on the hair is a likely cause, so wash the section, dry it completely and reapply with a fresh tape tab.
Visible tapes often come down to placement or section size. A hard lump under the fingers can mean hair has been trapped in the sandwich; open the tape, smooth the natural hair flat, and press again.
If discomfort persists, stop and seek a qualified stylist, who can assess whether a different placement or extension method would be safer.
Choosing Your Tape-In Extensions and Booking Your Install
Choosing the right tape-ins comes down to four things: colour match, texture, weight and length.
Match the shade to your root colour, not your ends. Roots are what the tape sits against, so a root match keeps the placement invisible. Match texture to your own hair too, whether that is straight, deep wave or kinky straight. For weight, the product listings suggest 200g for a full head, with 300g for more volume.
Our Raw Tape-In Extensions are made from 100% raw human hair with seamless, lightweight tape tabs that lie flat for an invisible blend. They are reusable: simply re-tape every few weeks as your hair grows. You can browse the Virgin Hair Highlight Tape Extensions for a dimensional blend, the Raw Straight Tape In Extensions for a clean straight finish, or the Tape Ins 200g if you need a fuller set. Prefer a colour match? Our Coloured Tape S range lets you pick a shade before you book.


A realistic note on DIY. The back of your head is hard to section alone, so for a seamless finish a stylist can help with the install.
Frequently Asked Questions
How far from the scalp should tape-in extensions be applied?
Keep the tape about 1 to 2 centimetres (roughly half an inch) from the root area, not pressed against the scalp. That gap leaves room for natural movement and keeps the bond comfortable.
Can you apply tape-in extensions at home?
Some people do, but it is not a straightforward DIY job. Sectioning evenly around the head, keeping wefts level and sandwiching the tape cleanly takes practice. If you want a truly seamless look, a professional install is the safer route, especially for a first set.
How many tape-in extension pieces do you need for a full head?
It depends on your hair density and the volume you want. Wigs Ldn's Raw Tape-In Extensions come in 50g bundles and the brand recommends 200g to 300g, or 4 to 8 packs, for a full head.
How long do tape-in extensions last and what aftercare keeps them in good condition?
With proper care, tape-in extensions are reusable and can be re-taped every few weeks as your hair grows. Wigs Ldn describes its raw tape-ins as reusable and built to last install after install. Brush gently, avoid heavy oil on the tape, and keep high, tight ponytails to a minimum.
Getting a seamless look is less about technique tricks and more about clean prep, correct placement and honest aftercare. If you would rather hand the tricky parts to someone who does this daily, Wigs Ldn offers made-to-order pieces crafted in the UK, a 30-day money-back guarantee and free worldwide delivery, with same day and next day options when you need them. Get started with Wigs Ldn and wear your tape-ins with confidence.
