

Last Updated: October 25, 2026
Quick Summary
To add baby hairs to wigs, you pluck 60-80% of the hairs from the lace front using fine-tipped tweezers, then lay them flat with edge control or gel, brushing them down and forward towards your face to create a natural, uneven hairline that blends seamlessly with the rest of the wig.
- You'll need fine-tipped tweezers, edge control or gel, a wig melt band (£2.99), and bleach knots (£25.00) to add baby hairs to wigs.
- Remove 60-80% of the hairs from the lace, leaving the finest and shortest strands for a sparse, natural look.
- Pluck starting at the temples and work inward, using firm, quick motions to avoid fraying the lace.
- Lay baby hairs with slight variation and randomness, avoiding a perfectly straight line for maximum realism.
- Use low heat from a hairdryer to set the gel and lock the baby hairs in place.
Table of Contents
- Why Baby Hairs Matter for a Natural Wig Look
- Essential Wig Baby Hair Tools You'll Need
- Preparing Your Wig Before Adding Baby Hairs
- How to Pluck Baby Hairs on a Wig
- How to Lay Baby Hairs on a Wig for Maximum Realism
- Styling and Finishing Your Baby Hair Edges
- Common Mistakes to Avoid When Adding Baby Hairs
- Customising Your Wig with Professional Baby Hair Styling
- Frequently Asked Questions
Why Baby Hairs Matter for a Natural Wig Look
Baby hairs are the fine, shorter strands that frame your hairline and temples. They're what create the illusion of hair growing naturally from your scalp rather than sitting on top of it.
This is especially important if you're wearing your wig for confidence, whether that's due to hair loss, alopecia, or simply wanting a style change.
When you add baby hairs to wigs, you're not just improving appearance. You're reclaiming control over how you present yourself.
Essential Wig Baby Hair Tools You'll Need
To add baby hairs to wigs, you'll need tools.
The core tools you need:
- Tweezers (fine-tipped, for precise plucking)
- A lace tint or concealer (to darken the lace knots)
- Bleach knots (£25.00, removes the dark dots on the knots, making them nearly invisible)
- A wig melt band (£2.99, secures and melts the lace to your skin for a seamless look)
- Edge control or gel (to lay baby hairs flat and keep them in place)
- A small brush or toothbrush (for styling the hairs smoothly)
- A hairdryer or heat tool (to set the gel)
The bleach knots service is described as bleaching the knots and eliminating small black dots.


The wig melt band is described as an accessory to secure your lace and help it melt.
Here are the core tools required to add baby hairs to wigs, along with their costs where applicable.
| Tool | Cost | Purpose |
|---|---|---|
| Tweezers (fine-tipped) | Not specified | Precise plucking of hairs |
| Lace tint or concealer | Not specified | Darken lace knots |
| Bleach knots | £25.00 | Remove dark dots on knots |
| Wig melt band | £2.99 | Secure lace to skin |
| Edge control or gel | Not specified | Lay baby hairs flat |
| Small brush or toothbrush | Not specified | Style hairs smoothly |
| Hairdryer or heat tool | Not specified | Set gel in place |
Preparing Your Wig Before Adding Baby Hairs
Once the knots are bleached (if you're doing that step), you're ready to pluck.
How to Pluck Baby Hairs on a Wig
The plucking process:
-
Identify your hairline shape, Decide where your baby hairs will end. This depends on your face shape and how you want to style your hair. Mark this mentally or lightly with a pencil if it helps.
-
Start at the outer edges, Begin plucking at the temples and work inward. This gives you a natural gradient of hair density.
-
Use firm, quick motions, Grab each hair close to the knot and pull in one swift movement. Hesitating makes it more painful for the lace (yes, the lace can fray if you're too gentle and tug repeatedly).
-
Remove most of the bulk, You're aiming to remove 60-80% of the hairs on the lace. You want it sparse, not completely bare. The finest, shortest hairs stay.
-
Leave the hairline uneven, A perfectly straight hairline looks fake. Real baby hairs are random. Leave some thicker in one spot, thinner in another. Vary the length slightly.
-
Check your work frequently, Step back and look at the overall shape. Adjust as needed before you've plucked too much.
How to Lay Baby Hairs on a Wig for Maximum Realism
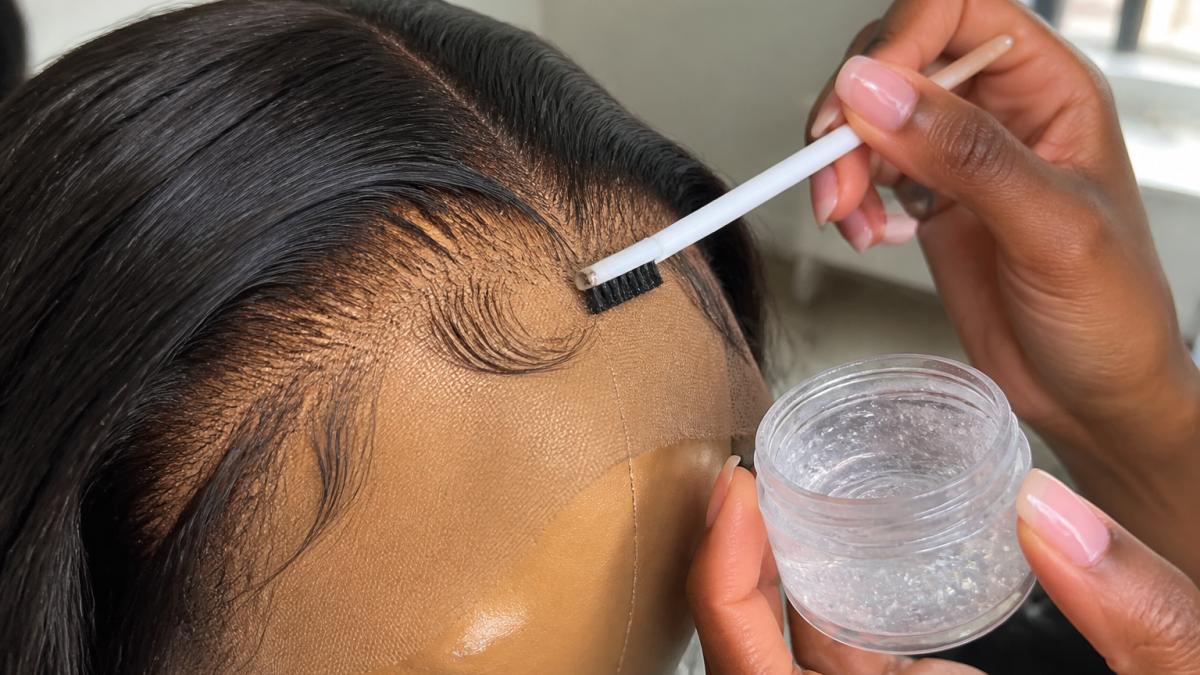
The laying process:
-
Apply edge control or gel, Use a light hand. You want just enough to hold the hairs, not so much that it looks wet or sticky. Start with a small amount and add more if needed.
-
Brush the hairs down and forward, Use a fine-tooth brush or old toothbrush to smooth the baby hairs toward your face. This direction creates the illusion of hair growing from your scalp.
-
Create a pattern, Don't lay every hair perfectly straight. Real baby hairs have movement and variation. Some should curve slightly, some should cross over each other. This randomness is what makes it look real.
-
Blend toward the thicker hair, As you move back from the edge, gradually transition into the fuller hair of the wig. There should be no harsh line between baby hairs and the rest of the hairline.
-
Use the wig melt band, Once you've laid the hairs, secure the lace with the melt band. This holds everything in place while the gel sets.
-
Dry with heat, A quick pass with a hairdryer on low heat sets the gel and locks the baby hairs in place. Don't use high heat, you'll damage the lace and the hair.
Styling and Finishing Your Baby Hair Edges
Choosing wig density for a natural look also affects how your baby hairs appear. A lower density hairline looks more realistic and allows your baby hairs to blend seamlessly. Higher density can overwhelm delicate baby hairs, making them less visible.
Common Mistakes to Avoid When Adding Baby Hairs
Don't skip the bleach knots. Yes, they cost extra. Yes, they take time.
Customising Your Wig with Professional Baby Hair Styling
Adding baby hairs to wigs is a skill that transforms how your wig looks and feels. It's the difference between a decent wig and one that looks like your own hair. Start with the right tools, take your time with plucking, and nail the laying process. If you're uncertain, professional styling removes the risk entirely. At Wigs Ldn, we create wigs that are ready for this level of detail, handcrafted with precision so every element, including baby hairs, contributes to a natural, confident appearance. Shop our collection and discover how a truly natural-looking wig can change how you feel every single day.
Frequently Asked Questions
What's the best way to add baby hairs to wigs for a completely natural look?
Add baby hairs to wigs by plucking individual strands from the hairline, then laying them flat with edge control gel or wig melt bands. Start with fewer hairs and build gradually, this prevents an overly thick, obvious appearance. Use a fine-tooth comb to smooth them down and melt the lace with a wig melt band for an undetectable finish that blends seamlessly with your skin tone.
Which wig baby hair tools are essential for this process?
The Wigs Ldn [wig melt band](https://wigsldn.co.uk/products/wig-melt-band) is £2.99. The [bleach knots service](https://wigsldn.co.uk/products/bleach-knots) is £25.00 and is described as bleaching the knots and eliminating small black dots.
How do you pluck baby hairs on a wig without damaging the lace?
Use sharp tweezers to gently pluck hairs from the hairline, working from the outer edges inward. Pull in the direction the hair grows to avoid tugging the delicate lace base. Take only 2-3 hairs at a time, and work slowly, rushing increases the risk of tearing the lace. If you're nervous, start with just a few strands to build confidence before adding more.
Can you add baby hairs to any wig, or do some types work better?
Wigs Ldn offers a [13x6 HD lace frontal](https://wigsldn.co.uk/products/13x6-lace-frontals-straight) and a [13x4 HD lace frontal](https://wigsldn.co.uk/products/13x4-hd-lace-frontals-virgin-hair). Both are made from 100% virgin human hair.
